Unlock more control over your Android device and IPTV subscription with Developer Options. This hidden menu provides access to advanced tools for seasoned Android users. Follow our guide to enable Developer Options and start customizing everything from CPU speeds to interface animations. Supercharge your IPTV subscription by tapping into extra performance, customization, and functionality on your Android TV box. The possibilities are endless!
IPTV Free Trial
- +1300 Live TV & +3000 VOD
- TV Guide (EPG)
- Plus with Catch Up & Cloud PVR
- Reliable & Stable Server
- Supported to Android & Firestick
- 3 days Free Trial, No CC
- Instant Activation
What are Android Developer Options?
Android Developer Options are a hidden toolkit packed with advanced features for developers and tech enthusiasts. This secret menu provides access to powerful options like USB debugging, mock locations, animation speed controls, and more. While mysterious to everyday users, these tools allow developers to test, optimize, and troubleshoot apps and devices.
The capabilities found in Developer Options cater to both power users and developers. However, caution is advised when changing settings, as incorrect configurations could affect system stability. Only modify options you fully understand, as the wrong tweaks can disrupt performance.
Tread carefully when exploring Developer Options. Think of it like a treasure chest – full of potent gems to enrich your Android experience if used wisely. With discernment, these clandestine tools can unlock your device’s true potential.
Read IPTV Casting Made Easy: How to Cast to FireStick from Device and How to Access Developer Options on Firestick.
How to Activate Developer Mode on Android
To activate Developer Mode on an Android device, you typically need to enable Developer Options, which contains a set of advanced settings and tools for developers. Here’s how to do it:
- 1. Launch the “Settings” app on your Android device.
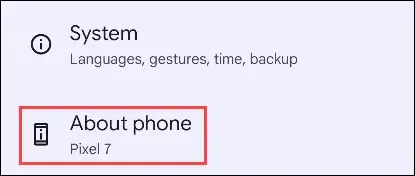
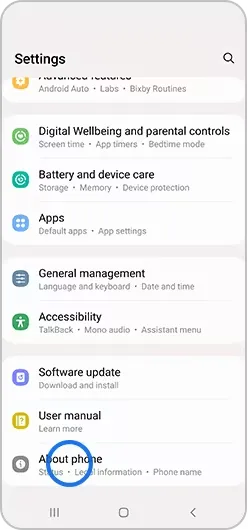
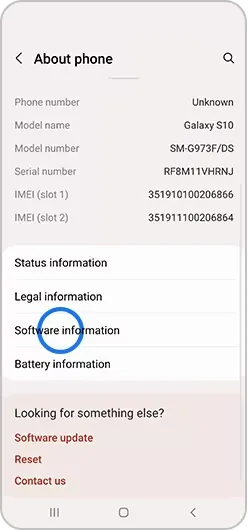
- 2. Navigate down and choose “About phone” or “About tablet,” with slight naming variations depending on your device model.

- 3. Locate the “Build number” entry within the “About phone” section and tap it repeatedly, usually around seven times in quick succession.


- 4. You’ll receive a prompt to enter your device’s PIN, pattern, or password to confirm your action.
- 5. Once the correct PIN, pattern, or password is entered, a message will confirm that you’ve become a developer or that Developer Options are now enabled.
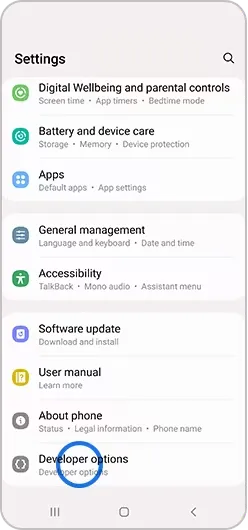
- 6. Return to the main “Settings” screen, and you’ll find a new menu option labeled “Developer options” or “System,” which contains the “Developer options” entry.

Congratulations! You’ve successfully activated Developer Mode on your Android device, granting you access to Developer Options for configuring advanced settings and tools used for development and debugging. Remember to exercise caution when making changes in Developer Options, as some settings may impact your device’s performance and stability.
Please keep in mind that the process of enabling Developer Mode can differ slightly depending on your specific Android device and its version. The provided steps are generally applicable to most Android devices. However, if you cannot locate the “Build number” or “Developer options” in your device’s settings, consider conducting a brief online search. Specify your device model and Android version to find more precise instructions tailored to your configuration.
It’s crucial to bear in mind that although Developer Mode empowers you with extra control and debugging features, responsible usage is paramount. Avoid making alterations that could potentially harm your device’s performance or stability.
What Is USB Debugging on Android?
USB Debugging on Android is a specialized feature that facilitates communication between your device and a computer equipped with the Android Software Development Kit (SDK) or Android Studio via a USB connection. This capability primarily caters to app developers and advanced users, offering invaluable tools for debugging, testing, and application development.
Activating USB Debugging on your Android device opens up a gateway for your computer to access the device’s system files and transmit commands and data to it.
USB Debugging empowers you to execute commands from your computer for tasks that cannot be initiated directly from your phone. This functionality proves indispensable when you intend to perform tasks like rooting your device, installing a custom ROM, or remotely managing your phone’s screen through your PC.
However, it’s essential to understand that enabling USB Debugging involves certain security considerations. By enabling it, you essentially authorize your computer to interact with your phone. This underscores the importance of manually granting permission from your phone, as outlined below.
How to Enable USB Debugging on Android
To enable USB Debugging on an Android device, follow these steps:
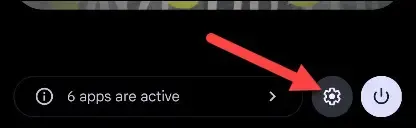
- 1. Launch the “Settings” app on your Android device, typically found in the app drawer or by swiping down from the top of the screen and selecting the gear icon.

- 2. On some devices, you’ll locate “Developer Options” directly on the main screen of the Settings app, while others may place it under the “System” section.
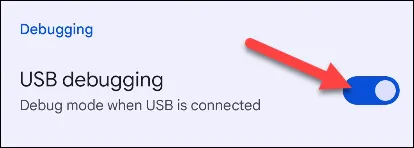
- 3. Scroll down within the “Settings” menu and search for “USB Debugging” under the “Debugging” category. Activate the toggle switch next to it.
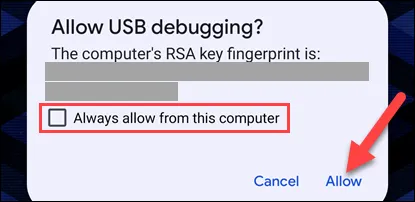
- 4. When you connect your Android device to a PC via USB for the first time, a prompt will appear, requesting your permission to enable USB debugging. Tap “Allow” and opt for “Always allow from this computer” to avoid future prompts.
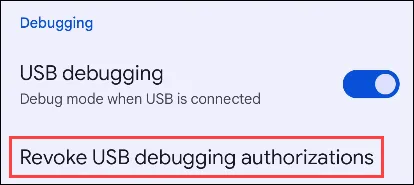
- 5. To manage the list of computers with USB debugging access, access the Developer Options menu and select “Revoke USB Debugging Authorizations.”
Your Android device is now ready with USB Debugging enabled. You can connect it to a computer and utilize tools like Android Debug Bridge (ADB) or Android development software such as Android Studio for a range of development and debugging tasks. Don’t forget to disable USB Debugging when not in use for security reasons.
How to deactivate developer options
To disable Developer Options on an Android device, follow these steps:
- Accessing Settings: Start by launching the “Settings” app on your Android device.
- Locate Developer Options: Depending on your Android version and device manufacturer, you may find “Developer options” in the “System” section. Tap on “Developer options” or “System” with “Developer options” listed beneath it to enter the Developer Options menu.
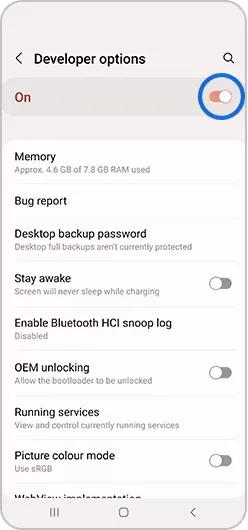
- Disabling Developer Options: Within the Developer Options menu, you’ll notice a switch or toggle labeled “Developer options” at the top. Simply slide this switch to the “Off” position.
- Confirmation Prompt: A confirmation prompt might pop up on your screen, explaining that disabling Developer Options will reset certain settings to their defaults. Confirm your choice by selecting “OK” or “Disable.”
Your Android device has now had its Developer Options disabled. The settings and options previously available through Developer Options are no longer accessible.
Remember, it’s advisable to disable Developer Options when not actively using them. Some of these settings can affect your device’s performance and security, and leaving them enabled unnecessarily is not recommended.
Video: How do I Enable the Developer hidden menu?
Unlocking Hidden Menu: Accessing “Developer Options” on Any Android Device
To unleash the full potential of your Android mobile phone, follow these simple steps to enable the hidden “Developer Options” menu:
- Navigate to Settings: Start by opening the “Settings” app on your Android device.
- Access Device Information: In the Settings menu, look for the “About device” or “About phone” option. This may vary slightly depending on your device model.
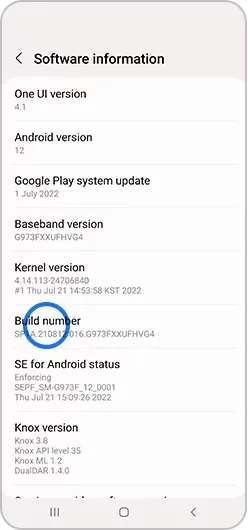
- Explore Software Information: Within the “About device” or “About phone” section, locate and select “Software information.”
- Trigger the Hidden Menu: Here comes the secret sauce – tap on “Build number” a total of seven times. Yes, seven! It might seem like a playful ritual, but it’s the key to unlocking advanced settings.
- Security Verification: For added security, your device will prompt you to enter your pattern, PIN, or password. This step ensures that only authorized users gain access to the Developer Options menu.
- Developer Options Unleashed: Voila! The magic is complete. You’ll now notice the “Developer options” menu proudly displayed within your Settings. This menu grants you access to a plethora of advanced settings, unleashing the full potential of your Android device.
With Developer Options at your fingertips, you’re equipped to customize, optimize, and explore your Android mobile phone like never before. Just remember to use these advanced settings responsibly, as some tweaks can affect device performance. Check out the video below for details on how it works.
How to Turn on the Developer Options menu on a Samsung Galaxy device?
First of all, you need to know that on most Android devices, the developer options menu is hidden by default. To unhide the Developer options menu, you need to do the following steps.
Unlocking Advanced Settings: Enabling Developer Options on Your Android Device
- 1. Access Settings: Begin by navigating to your device’s “Settings.”
- 2. Find Device Information: Within the Settings menu, you’ll typically find “About Device” or “About Phone.” Click on this option.
- 3. Software Insight: Next, select “Software Information.” Note that depending on your device and operating system, you might skip this step.
- 4. Magic Number Seven: Here’s where the magic happens – tap on “Build number” a total of seven times. Depending on your device, this could be all you need to do.
- 5. Security Check: To ensure the security of your device, you’ll be prompted to enter your pattern, PIN, or password. This step safeguards the Developer Options menu, ensuring only authorized users can access it.
- 6. Developer Options Unveiled: Now, behold the “Developer options” menu. It may appear directly in your Settings menu, or you might find it under “Settings” > “General” > “Developer options,” depending on your device.
- 7. Disabling Developer Options: When you’re done with advanced tweaks, you can easily disable the Developer Options menu by toggling the switch.
With Developer Options now at your disposal, you’re ready to explore and customize your Android device like a pro. Keep in mind that some adjustments may impact your device’s performance, so use these settings judiciously. Enjoy enhanced control over your Android experience!
Video: How to Turn on the Developer Options menu on Samsung Galaxy Smartphone?
How do I unlock developer options on Android 13?
If you’re curious about enabling developer options on your Android 13 device, you’ve come to the right place. In this guide, we’ll lead you to the precise location where you can activate these developer options. Let’s walk through the steps outlined below to enable developer options seamlessly:
- How to Trigger Developer Options in Android 13
- Activating Developer Options on Android 13
- Accessing Developer Settings in Android 13
- Enabling USB Debugging on Android 13
- Unlocking OEM on Android 13
Is it safe to enable developer mode in Android?
Developer mode can be highly beneficial for Android power users and developers. However, it should be used responsibly with an understanding of the potential risks.
The advantages of Developer mode include:
- Access to advanced settings for customization and debugging
- Ability to sideload apps and make system modifications
- Useful tools for developers like USB debugging
However, there are also important considerations:
- Security risks if advanced settings are misused
- Potential system instability from faulty modifications
- Increased vulnerabilities if functions are exploited
Developer mode offers useful capabilities but can impact device security and stability if misused. It should only be enabled when necessary and used cautiously by those who understand the implications. Responsible use is key to realizing the benefits while minimizing the risks.
What Happens When You Enable Developer Options on Android?
Here’s an overview of what happens when you enable Developer options on an Android device:
- Unlocks advanced settings and tools for developers and power users. These are hidden by default for regular users.
- Allows USB debugging which lets you connect the device to a computer and access it via ADB (Android Debug Bridge). Helpful for developing/testing apps.
- Provides access to debug settings like demo mode, mock locations, screenshot shortcuts, etc. Useful for testing and troubleshooting.
- Lets you modify system settings like animation speeds, background processes, and WiFi settings that are otherwise locked. Allows customization.
- Allows sideloading of APK app files downloaded from outside the Play Store. By default, this is blocked for security.
- Exposes all app permission groups so you can selectively revoke app permissions. Gives more control over privacy.
- Unlocks other developer-centric settings for analyzing app resources, running GPU tests, wireless overlay debugging, etc.
- Disables certain optimizations like background process limits to better test app performance.
So in summary, Developer options unlock a suite of advanced tools and settings aimed at developers and power users. But it can impact security and stability if misused. Enable it only when needed. Use responsibly.
FAQ
1. What do I turn on developer options?
How to Enable Developer Options:
- Go to Settings > System.
- Tap About Phone.
- Tap the Build Number field 7 times. You will see a message as you get close to 7 taps.
- After completing 7 taps, tap the back arrow.
- Developer Options will now show up under Settings.
By following these simple steps, you can enable Developer options. Note that enabling them unlocks advanced settings that may impact system stability and security. It’s recommended to only enable them when needed and use related features cautiously. Developer options are not required for regular non-developer users.
2. Is developer options good or bad for Android?
Enabling Developer Options does not immediately change anything on your phone. It simply unlocks access to advanced settings that could potentially impact your device’s functionality if modified. However, your phone will remain unchanged until you deliberately adjust those developer settings.
This is why Developer Options are usually hidden by default on most phones – to prevent users from accidentally changing advanced settings and affecting their device’s stability or security. The settings are there if you need them, but won’t affect your phone unless explicitly configured.
So you can safely enable Developer Options without worry, as long as you avoid randomly modifying unfamiliar system settings. Only make deliberate changes if you fully understand the consequences. Leaving the settings untouched will ensure enabling Developer Options has no unwanted side effects.
3. How do I enable USB debugging on Android 12?
Here are the steps to enable USB debugging:
- Open Settings on your Android device.
- Tap Developer Options. (Note: Developer options are hidden by default.)
- In Developer Options, enable USB debugging.
- Set the USB mode on your device to Media device (MTP). This is the default USB mode.
With USB debugging enabled and USB mode set to MTP, you can now connect your Android device to a computer and debug apps over the USB connection. The MTP mode allows the computer to access media files on your device while also permitting USB debugging at the same time.
Please be aware that USB debugging reduces the security of your device when connected to a computer. Only enable it when needed for development purposes.
4. How do I get developer options on Android 11?
- Go to Settings and tap on System.
- Tap on Advanced to expand the list, then tap on Developer Options.
- You will now see the full list of Developer Options that you can configure.
Please note that Developer Options contain advanced settings that may affect system stability and security when enabled. If you are not a developer, you likely do not need to enable Developer Options. Do not randomly modify Developer Options unless necessary, as incorrect configurations could negatively impact your system. Use them with caution.
5. Why is my Android not showing Developer options?
- Step 1: Navigate to “Settings” and select “About phone.”
- Step 2: Scroll down until you reach the “Build number.”
- Step 3: Tap the “Build number” entry seven times. As you tap, you’ll notice the step count decreasing until you’ve successfully unlocked the developer options.
6. What is the disadvantage of the developer option in Android?
Sometimes, even after completing the steps to activate Developer options, they still do not appear. The Developer options may already be enabled but can be hard to find due to the complex menu structure on some devices.
If you cannot locate Developer options after enabling them, try searching the Settings app for keywords like “Developer” or “Debugging.” The location varies between Android versions and device manufacturers. Developer options may be nested under System, Additional Settings, or Advanced Options.
Persist in hunting through the Settings menus and submenus if Developer options remain hidden after being enabled. The path to uncovering them may be convoluted, but they are present somewhere in Settings. With patience, you can uncover the Developer options to access all the developer tools.
7. Why doesn’t my Samsung have developer options?
On Android 4.1 and older, the Developer Options screen is easily accessible. However, on Android 4.2 and newer, you must manually enable Developer Options first.
Please note – the location and name of this screen vary on some devices. To enable it, go to Settings > About Phone and tap the Build Number 7 times. You’ll see a message saying “You are now a developer!” after the 7 taps.
This toggle is there because Developer Options contains sensitive settings that could potentially impact system stability and security if changed randomly. It is meant for developers rather than regular users. Proceed with caution when enabling and using these advanced developer tools.
8. Is it good to enable the developer option in Android?
No, enabling Developer Options won’t cause any issues with your phone or its functionality. Instead, it grants you access to various developer-centric settings, such as displaying touch positions and enabling USB debugging (commonly used for rooting). However, modifying certain settings like animation scale can potentially decrease your device’s performance.
9. Is it safe to enable developer mode?
No, having developer settings enabled does not pose any technical security concerns. The primary reason for their default disablement is that these settings are not essential for typical users, and some of the options can be risky if misused.
Conclusion
Take your Android experience to the next level with Developer Options. From optimizing your IPTV subscription to testing experimental features, you’ll gain greater customization and control. Sign up for a free IPTV trial to explore these advanced settings on a cutting-edge Android TV box. With Developer Options enabled you can mold your device into a powerhouse tailored for media, gaming, productivity, and more. Maximize features like screencasting and video overlays during your IPTV free trial for the ultimate streaming experience. The journey never ends when it comes to unlocking the full potential of Android.